Pesticide toxicity refers to the potential harm pesticides can cause to humans, animals, or the environment. To use pesticides safely, you need to assess both their toxicity and your exposure to them. The equation is simple: Risk = Toxicity × Exposure. While you can’t change how toxic a pesticide is, you can reduce your exposure by using the right protective equipment, following safety guidelines, and adhering to legal requirements.
Here’s a quick breakdown of the 5 steps to assess pesticide toxicity:
- Identify the Hazards: Check pesticide labels and Safety Data Sheets (SDS) for toxicity levels, signal words (like DANGER or CAUTION), and ingredient risks.
- Evaluate Dose-Response Relationships: Understand how much exposure is considered safe by analyzing LD50 (lethal dose) and NOAEL (no observed adverse effect level) data.
- Assess Exposure Levels: Determine how pesticides might contact your skin, lungs, or eyes during application and how to minimize these risks.
- Characterize the Risk: Combine toxicity and exposure data to calculate the likelihood of harm and identify safety margins.
- Apply Results to Field Practices: Use findings to choose proper protective gear, follow restricted-entry intervals (REIs), and comply with legal safety standards.
National Pesticide Applicator Certification Core Manual – Ch 5: Pesticide Hazards And First Aid
sbb-itb-c4006de
Step 1: Identify the Hazards
Pesticide Toxicity Categories and Signal Words Quick Reference Guide
Identifying hazards is a crucial starting point for assessing pesticide toxicity. This step involves evaluating the chemical makeup of the pesticide and understanding the associated health risks and first aid. Two key resources to guide this process are the pesticide label and the Safety Data Sheet (SDS).
Reading Pesticide Labels
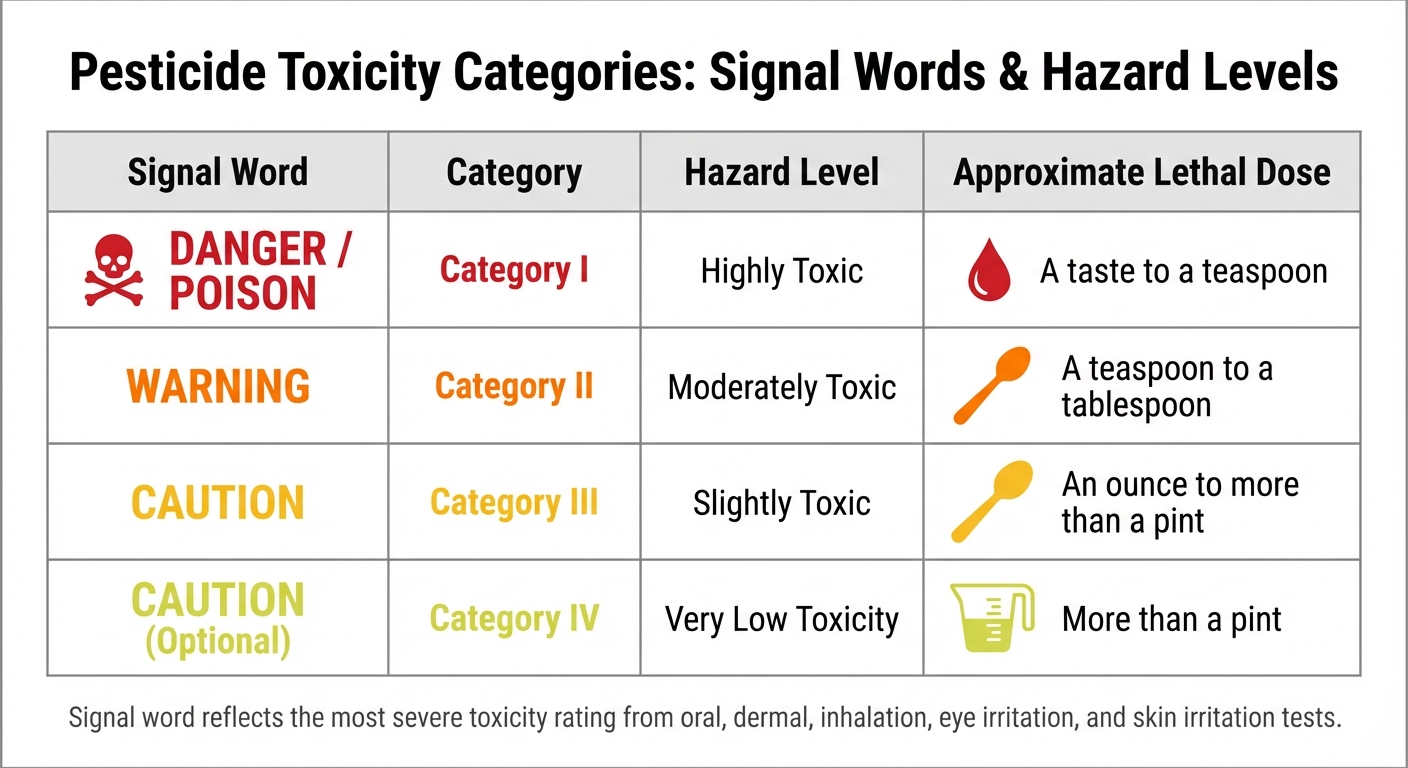
A pesticide label is more than just packaging – it’s a legal document that outlines toxicity levels. The signal word on the front panel is your first clue, indicating the product’s acute toxicity level. Pesticides are grouped into four toxicity categories, based on five acute toxicity tests: oral, dermal, inhalation, eye irritation, and skin irritation.
Here’s a quick breakdown of signal words and what they mean:
| Signal Word | Category | Hazard Level | Approximate Lethal Dose |
|---|---|---|---|
| DANGER / POISON | Category I | Highly Toxic | A taste to a teaspoon |
| WARNING | Category II | Moderately Toxic | A teaspoon to a tablespoon |
| CAUTION | Category III | Slightly Toxic | An ounce to more than a pint |
| CAUTION (Optional) | Category IV | Very Low Toxicity | More than a pint |
If you spot a red "POISON" label with a skull and crossbones, it signals Category I toxicity through oral, dermal, or inhalation exposure. The signal word reflects the most severe toxicity rating from the tests. Additionally, products containing 4% or more methanol must display "DANGER", regardless of other results.
Beyond signal words, check the precautionary statements. These outline specific risks based on the route of exposure – whether it’s through your skin, eyes, lungs, or mouth. They may also warn about delayed effects like tumors or reproductive issues. The ingredient statement lists active ingredients and their percentages, helping you identify specific chemical risks. Products marked as "Restricted Use Pesticides" (RUP) at the top of the label are meant only for certified applicators.
"Signal words indicate the relative acute toxicity of the product to humans and animals." – Penn State Extension
After reviewing the label, turn to the SDS for more in-depth information.
Using Safety Data Sheets (SDS)
The SDS is a standardized 16-section document that provides detailed hazard and toxicity data. Section 2 highlights hazard classifications, signal words, hazard statements, and GHS pictograms – visual symbols like a skull and crossbones for acute toxicity or an exploding chest for severe health risks. Section 11 lists LD50 and LC50 values, which quantify toxicity. For instance, Category I products have an acute oral LD50 of 50 mg/kg or less, while Category IV products exceed 5,000 mg/kg.
The SDS also addresses long-term health risks, such as whether a chemical may cause cancer, genetic changes, or reproductive harm. Sections 4, 8, 9, and 10 are especially important for understanding first-aid measures, personal protective equipment (PPE) requirements, and physical hazards like flammability or reactivity.
"The information contained in the SDS is largely the same as the MSDS, except now the SDSs are required to be presented in a consistent user-friendly, 16‑section format." – PestCEUs1
Step 2: Evaluate Dose-Response Relationships
Once hazards are identified, the next step is to quantify safe exposure limits by examining dose-response relationships. This process helps determine how much of a substance can be safely encountered without causing harm. Paracelsus’s famous principle, "The dose makes the poison", perfectly encapsulates this idea: even substances considered highly toxic can be harmless at very low doses, while seemingly harmless substances – like water – can become dangerous in excessive amounts.
For pesticides, the relationship between exposure levels and health effects often follows a predictable pattern. For example, a pesticide with an LD50 of 10 mg/kg is 10 times more toxic than one with an LD50 of 100 mg/kg. This means the more toxic pesticide requires only one-tenth the dose to produce the same lethal effect in half of the test population. Recognizing these thresholds is essential for determining safe handling guidelines and identifying when exposure levels start to become risky.
Understanding Toxicity Thresholds
Toxicity thresholds are typically defined by two key measurements: LD50 and NOAEL.
- LD50 (Lethal Dose, 50%): This measures the dose required to kill 50% of a test population, usually over a 14-day period.
- NOAEL (No-Observed-Adverse-Effect Level): This represents the highest dose at which no harmful effects are observed when compared to untreated subjects.
The NOAEL is especially important for determining safe exposure levels. As the National Research Council explains:
"The NOAEL is the highest exposure at which there is no statistically or biologically significant increase in the frequency of an adverse effect when compared with a control group."
For non-carcinogenic substances, the NOAEL helps define a safety threshold – an exposure level below which no harm is expected, even with repeated contact. However, for carcinogens, regulators often operate under the assumption that no safe threshold exists, meaning any amount of exposure carries some level of risk.
Another key measurement, the Lowest-Observed-Adverse-Effect Level (LOAEL), identifies the dose at which harmful effects first appear. This helps scientists draw the line between safe and unsafe exposure levels.
Calculating Safety Margins
Regulatory agencies use safety margins to ensure exposure limits account for variability and protect public health. The NOAEL isn’t used directly as the acceptable limit; instead, it’s divided by safety factors to create a buffer. Typically, a 100-fold safety margin is applied by dividing the NOAEL by:
- A 10-fold factor to account for differences between species (e.g., animals vs. humans)
- Another 10-fold factor to account for variability among individuals
The resulting value is called the Reference Dose (RfD) or Acceptable Daily Intake (ADI). For example, if animal studies determine a NOAEL of 10 mg/kg/day, the RfD for humans would be 0.1 mg/kg/day (10 ÷ 100). To further protect vulnerable populations like infants and children, the Food Quality Protection Act may require an additional 10-fold safety factor if data suggests they are more sensitive to certain substances.
These calculations directly influence the tolerances set for pesticide residues on food. As Pennsylvania State University explains:
"A tolerance is set low enough to ensure that even if someone ate only food items with residues of a given pesticide at the tolerance limit, there would still be a safety factor of at least 100 when compared to a level causing no observable effects in laboratory animals"
This cautious approach ensures that actual exposure levels remain far below those that could cause harm, providing a strong layer of protection for public health.
Step 3: Assess Exposure Levels
Once you’ve evaluated dose-response relationships, the next critical step in risk assessment is determining how much actual exposure occurs. This involves identifying how people come into contact with pesticides – whether during application or by entering treated areas. Keep in mind that risk is a combination of both toxicity and exposure levels.
Common Exposure Situations
Pesticides can enter the body in four main ways: through the skin (dermal), lungs (inhalation), ingestion (oral), and eyes (ocular). Understanding which route is most likely in a given situation helps applicators focus on the right protective strategies.
For most applicators, dermal exposure is the leading route, making up about 90% of all pesticide contact. This can happen during tasks like mixing and loading concentrated pesticides, when spray drift lands on the skin, or while cleaning equipment. Absorption rates differ depending on the body part. For example, the groin absorbs pesticides over 11 times faster than the forearm, making contact with sensitive areas particularly dangerous – almost like injecting the pesticide directly into the bloodstream.
Different roles in pesticide handling come with unique risks:
- Mixer/loaders face the highest exposure risk due to splashes and direct contact with concentrated products.
- Applicators are exposed to spray drift, vapors, and equipment contact during application.
- Flaggers near aerial spraying are at risk from drift exposure.
- Post-application exposure happens when workers or residents touch treated plants, contaminated surfaces, or inhale residue and dust.
Good hygiene practices can significantly lower these risks. For example, never use your mouth to clear a clogged nozzle, and always wash your hands before eating, drinking, or smoking after handling pesticides. Also, avoid wearing contact lenses during application, as they can trap chemicals against your eyes, increasing exposure.
With these exposure routes in mind, the next step is to calculate the actual levels of contact using standardized methods.
Calculating Exposure Amounts
To estimate exposure levels, standardized tools and formulas are used. The EPA’s Occupational Pesticide Handler Exposure Calculator contains data for over 1,000 pesticide handling scenarios. This tool relies on databases like the Agricultural Handler Exposure Task Force (AHETF) and the Outdoor Residential Exposure Task Force (ORETF).
For handlers such as mixers, loaders, and applicators, the unit exposure method calculates risk based on the amount of active ingredient handled. The formula is:
Daily exposure dose = Unit exposure × kg ai handled/day × % absorbed / Body weight.
Unit exposure values depend on the equipment and protective gear used. For instance, using a backpack sprayer with single-layer clothing and no gloves results in a dermal unit exposure of 128.75 mg a.i./kg handled, while adding gloves reduces this to 67.24 mg a.i./kg handled.
For post-application workers, the transfer coefficient method estimates dermal exposure by relating it to dislodgeable foliar residues (DFR) or turf transferable residues (TTR) on treated surfaces over time. This method helps determine safe reentry intervals for tasks like harvesting or scouting.
In bystander and residential scenarios, the Average Daily Dose (ADD) method calculates exposure from contaminated food, water, or soil. The formula is:
ADD = (Concentration × Intake Rate × Exposure Frequency × Exposure Duration) / (Body Weight × Averaging Time).
This approach accounts for multiple exposure pathways simultaneously, offering a complete view of overall exposure.
Finally, engineering controls can greatly reduce exposure levels. For example, using closed loading systems or operating within enclosed tractor cabs can significantly lower unit exposure values. Combining these measures with the right personal protective equipment (PPE) ensures safer pesticide handling across all tasks.
Step 4: Characterize the Risk
Risk characterization is the final step in assessing pesticide risks, tying together the findings from hazard identification, dose-response analysis, and exposure estimation. By combining these data points, you get a clearer picture of the actual risk posed by a pesticide. This phase focuses on two key aspects: risk estimation and risk description.
- Risk estimation involves calculating the likelihood of harm by combining exposure data with toxicity effects.
- Risk description translates these calculations into practical, real-world contexts, helping stakeholders understand the implications.
Reading Risk Assessment Results
To interpret risk, tools like the Margin of Exposure (MOE) are used. The MOE is essentially a ratio comparing the toxicity threshold (e.g., NOAEL) to the estimated human dose. A lower MOE signals higher risk, while a higher MOE indicates greater safety.
"The ratio of the NOAEL to the estimated human dose gives an indication of the margin of safety for the potential risk. In general, the smaller the ratio, the greater the likelihood that some people will be adversely affected." – National Research Council
For non-cancer risks, regulators use benchmarks like the Reference Dose (RfD) or Acceptable Daily Intake (ADI). These values are derived from the NOAEL but adjusted with uncertainty factors – typically ranging from 10 to 1,000. A common adjustment factor is 100, which accounts for interspecies differences (10×) and variability among humans (10×). If human exposure stays below the RfD, the risk is generally deemed acceptable.
Cancer risks are treated differently since no "safe" threshold is assumed. Regulators rely on mathematical models to extrapolate from high-dose animal studies, estimating an "upper bound" for lifetime cancer risk at lower exposure levels. This conservative method ensures even minimal risks are accounted for.
A fundamental distinction to keep in mind is the difference between hazard and risk. As the FAO clarifies:
"A hazard assessment is based on the intrinsic toxicity of the product and does not take into account the degree of exposure… exposure to a product with a relatively high hazard does not necessarily result in a high risk, if the degree of exposure is low." – FAO
In practice, even highly toxic pesticides can be managed safely if exposure is minimized through measures like engineering controls, proper use of personal protective equipment (PPE), and strict adherence to product labels.
Handling Data Uncertainty
Risk assessments rarely have perfect data, so uncertainty is an inevitable part of the process. To address this, assessors incorporate additional uncertainty factors when data is incomplete. For example:
- When toxicity data is limited – using LOAEL instead of NOAEL or extrapolating exposure durations – an extra safety factor (often 10×) is applied.
- When specific species data is unavailable, surrogate data (e.g., fish data for amphibians or bird data for reptiles) can fill the gap, allowing decisions despite incomplete testing.
Modern assessments increasingly use probabilistic models like Monte Carlo simulations. These models account for variations in human populations (age, sex, health conditions) and background exposure levels, offering a more comprehensive range of potential outcomes.
When interpreting results, default assumptions should be applied consistently to avoid underestimating risks. Additionally, standardized frameworks like the Globally Harmonized System (GHS) or WHO classifications provide reliable baselines for hazard identification before tailoring risk characterizations to specific sites.
Step 5: Apply Assessment Results to Field Practices
Turn your risk assessment findings into actionable safety measures in the field. Use your toxicity and exposure data to guide decisions about protective measures, including PPE (Personal Protective Equipment), Restricted Entry Intervals (REIs), and label compliance.
Selecting Personal Protective Equipment (PPE)
Your choice of PPE should align with the hazard and exposure levels identified in your assessment. While the toxicity of a pesticide cannot be altered, PPE plays a key role in reducing exposure.
For products in Toxicity Category I or II (high acute dermal toxicity or skin irritation), additional PPE like chemical-resistant aprons and headgear is often necessary. Acute inhalation hazards in these categories require respiratory protection. The baseline PPE for all occupational pesticide products includes a long-sleeved shirt, long pants, socks, and shoes.
Glove use is critical. Studies reveal that workers mixing pesticides experience 85% of their total exposure on their hands and 13% on their forearms. Proper gloves can reduce hand exposure by up to 98% during spills. For example, a study on glyphosate showed that workers without gloves had an average urinary concentration of 232.7 ppb after a spill, compared to just 4.1 ppb when gloves were worn.
For liquid pesticides, refer to the EPA Chemical Resistance Category (A–H) on the label to choose the right glove material, such as nitrile, butyl rubber, or Viton. Glove thickness is measured in mils (1 mil = 0.001 inch), with commonly used gloves ranging from 12 to 22 mils.
Respirators must match specific hazards, using the NIOSH color-coding system for cartridges: Black for organic vapors, Green for ammonia, and Yellow for acid gases. OSHA mandates fit testing for every respirator use. Replace standard chemical-resistant gloves every 5–7 workdays and heavy-duty nitrile or butyl gloves every 10–14 days.
In addition to wearing the right PPE, following label instructions and observing REIs are essential steps to ensure safety in the field.
Following Label Instructions and REIs
REIs are legally mandated and based on the highest acute toxicity category for dermal, eye, or skin irritation. These intervals prevent exposure risks and are directly tied to your toxicity assessment.
| Most Severe Toxicity Category | Required Restricted Entry Interval (REI) |
|---|---|
| Category I (Highly Toxic) | 48 hours |
| Category II (Moderately Toxic) | 24 hours |
| Category III or IV (Slightly/Low Toxicity) | 12 hours |
| Organophosphates (applied in low rainfall areas) | 72 hours |
The "Agricultural Use Requirements" box on the pesticide label provides detailed REI, PPE, and worker notification instructions as required by the Worker Protection Standard (WPS). Always follow the "Mandatory Statements" (e.g., "Do not enter treated area for 12 hours"), as these are legally enforceable, unlike "Advisory Statements", which are recommendations. Workers are prohibited from entering treated areas during the first 4 hours after pesticide application, regardless of the REI.
When multiple pesticides with different REIs are applied together, the longest interval applies. Employers must also display pesticide safety information, emergency contact details, and a 30-day application list (including product name, EPA registration number, and REI) in a central location accessible to all workers.
Workers may enter treated areas during an REI only for limited-contact tasks (e.g., irrigation) or emergencies, but they must wait at least 4 hours and wear the specified PPE. Employers are responsible for providing, cleaning, and maintaining PPE. If PPE becomes soaked or heavily contaminated, it must be discarded. Additionally, when workers wear PPE due to toxicity risks, employers must implement measures to prevent heat-related illnesses.
Professional Training for Toxicity Assessment
State-Approved Training Programs
Certification and licensing programs are crucial for ensuring that pesticide applicators are well-trained and competent, minimizing the risk of misuse. Federal and state laws mandate certification for purchasing or applying Restricted Use Pesticides (RUPs), which pose higher risks to human health and the environment. These training programs emphasize understanding toxicity levels and managing risks effectively. State-approved platforms provide both initial certification and ongoing education through continuing education units (CEUs) and category-specific credits. This ensures applicators stay informed about changing regulations and maintain safe practices in the field.
For example, Cornell University’s PMEP offers "Core Level Module 4 – Toxicity of Pesticides", granting 1 Core credit for New York applicators. Similarly, Oregon State University’s Professional and Continuing Education (PACE) provides courses like "Pesticide Labels and Formulations" and "The Label is the Law", each approved by the Oregon Department of Agriculture and priced at $35 per course. Oklahoma State University Extension also delivers specialized training on topics such as LD50/LC50 values and signal words in its "Toxicity of Pesticides" modules.
Online Pest Control Courses is another option, offering state-approved online training and recertification programs for applicators. These courses cover essential topics like pesticide laws, formulations, environmental impact, and pest management strategies. They are accessible on various devices, and participants can instantly download certificates upon completion.
In North Carolina, private applicators must recertify every three years by completing 4 CEU hours (2 V-credit for general safety and 2 X-credit for specialty training). Commercial applicators, on the other hand, recertify every five years, requiring 3–10 CEU hours. Additionally, applicants must pass proctored exams with a minimum score of 70%.
Why Continuing Education Matters
As safety standards evolve, ongoing education is critical to reinforcing key concepts in toxicity assessment. It helps applicators differentiate between acute toxicity (immediate effects) and chronic toxicity (long-term risks like cancer or birth defects). A pesticide with low acute toxicity could still have serious chronic health implications. For instance, the Agricultural Health Study, which examined over 90,000 certified pesticide applicators and their spouses, found links between certain pesticides and health effects that standard EPA animal testing might not reveal.
Regulations are constantly updated to reflect new findings. In 2025, new pesticide regulations and competency standards were introduced, including specific training requirements for noncertified applicators. Staying updated through continuing education helps applicators understand and implement new risk management measures, such as changes to restricted entry intervals (REIs), pre-harvest intervals, and buffer zones.
"Not following the label is not only illegal – it is also dangerous because it ignores practices put in place to prevent hazard, exposure, and risk." – Pesticide Environmental Stewardship
Regular training also emphasizes critical safety measures, such as reducing dermal exposure, which accounts for about 90% of all pesticide-related exposure. Proper use of personal protective equipment is essential in minimizing these risks. Applicators must also track their recertification credits through state-approved portals to ensure compliance and avoid lapses in certification.
Conclusion
To ensure safety for yourself, your team, and the environment, it’s crucial to assess pesticide toxicity in a structured way. A five-step process simplifies complex evaluations into actionable steps you can follow daily. From identifying hazards to implementing field practices, each step strengthens your overall safety plan. Whether you’re interpreting the pesticide label or comparing safety data for selecting PPE, every action contributes to a comprehensive safety framework.
Remember the formula: Risk = Toxicity × Exposure. While you can’t alter a pesticide’s inherent toxicity, you have full control over your exposure. Each decision you make – whether it’s checking signal words, adhering to label directions, or wearing the right protective gear – plays a role in reducing risk.
"All pesticides can be handled safely by using safety practices that minimize or eliminate your exposure to them." – Oklahoma State University Extension
Toxicity science is constantly advancing. The EPA regularly reevaluates older pesticides, applying modern toxicology standards. This means the knowledge you gained during your initial certification may no longer align with current best practices. Staying informed through ongoing education is not just a legal obligation but also a key step in protecting yourself from emerging risks.
As regulations and scientific understanding evolve, so must your approach. As a certified applicator, you are legally responsible for the proper and safe use of pesticides. Participating in regular training – such as the programs offered by Online Pest Control Courses – helps you stay updated on regulatory changes, interpret new safety data, and maintain your certification. By following these steps, you can make informed decisions that balance pest management effectiveness with personal safety, whether you’re dealing with a highly toxic Category I pesticide or a less hazardous Category IV product.
FAQs
What’s the difference between hazard and risk?
Hazard describes a pesticide’s potential to cause harm, focusing on its inherent danger. Risk, on the other hand, factors in the likelihood of that harm occurring, considering exposure and specific conditions. Simply put, hazard is about the danger itself, while risk evaluates the chances of that danger impacting people or the environment.
How do I use LD50 and NOAEL to judge safety?
LD50, or Lethal Dose 50%, is a measure of acute toxicity. It represents the amount of a substance required to cause death in 50% of a group of test animals. A higher LD50 value indicates lower toxicity, meaning it takes more of the substance to reach a lethal threshold.
On the other hand, NOAEL, or No Observed Adverse Effect Level, identifies the highest dose at which no harmful effects are observed. This metric is crucial for determining safe exposure limits over time.
Together, these measures play distinct but complementary roles in safety evaluation. LD50 helps assess immediate risks from short-term exposure, while NOAEL focuses on long-term safety and acceptable exposure levels.
How can I estimate my exposure during application?
To estimate exposure during pesticide application, apply the hazard equation: Hazard = Toxicity x Exposure. This involves evaluating the pesticide’s toxicity alongside factors such as how it’s applied, the duration of use, and environmental conditions like wind. Minimizing exposure is key – this can be achieved by using appropriate personal protective equipment (PPE) and sticking to recommended safety practices. Recognizing whether toxicity is acute or chronic and following established safety guidelines are crucial steps for an accurate assessment of potential risks.